Pogohawk
146 posts
Jun 08, 2010
9:27 PM

|
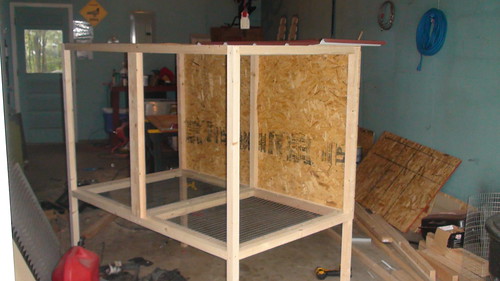
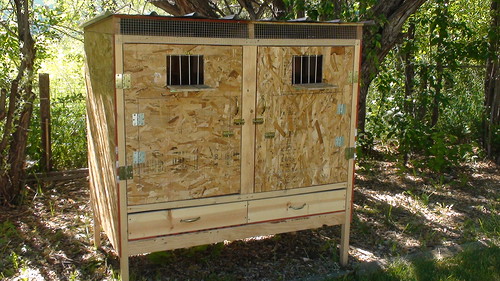
Its a work in progress.
|
Oldfart
GOLD MEMBER
1821 posts
Jun 09, 2010
5:06 AM
|
Looks like a good start. Makes me want to build another box! :)
Thom
|
steve49
513 posts
Jun 09, 2010
12:10 PM
|
is that 1x1 mesh? if so, great choice.
----------
Steve in Blue Point, NY
|
donnie james
1028 posts
Jun 09, 2010
1:07 PM
|
hay pogohawk,
very nice fly box when you get it done.......
-------
Donny James
"Fly The Best And Cull The Rest"
"Saying One Thing;Doing Its Another"
"Keep Your Head Planted In The Sky And Wings Spanned Wide"
1996 Piedmont Roller Club Lifetime Achievement Recipient
Portsmouth Roller Club Participation Award System Recipient 1994 '96 '97 And 2000
2001 Limestone,Ohio Sportsman's Club Lifetime Member Recipient
2002Portsmouth Roller Club Certified Judge
2004Portsmouth Roller Club Lifetime Member Recipient
"Miss Portsmouth"NBRC/90/J311 Rusty Dun Check Self Hen First Bird To Get Certified In Portsmouth Roller Club History With A Score Of 53 Judge By Joe Roe The 1993 World Cup Winner And John Bender The 1994 World Cup Winner
|
Squabby*32
278 posts
Jun 10, 2010
7:20 AM
|
Nice Kit Box. I would try to slant the roof it was going to be kept outside in the elements. Will help with the rain.
----------
DJJeffman Spinners
ATAPWGIYAHTLY
|
Tony Chavarria
Site Publisher
4095 posts
Jun 10, 2010
7:24 AM
|
Good suggestion on the slanting roof! Also, think about adding a "skirt" around the legs of the box to hide the droppings from plain view. Just be sure to include an access point to reach in with a shovel to remove the droppings. Also, think about the airflow to keep droppings on the dry side. Corrugated metal siding has worked for my kit boxes. Keep up the good work!
----------
FLY ON!
Tony Chavarria
The highest form of ignorance is to reject something you know nothing about.” – Dr. Wayne W. Dyer
|
TheGame
754 posts
Jun 12, 2010
10:12 PM
|
Just attach 1x3's to the middle, left and right of the frame. Do it so that it leaves an inch or 2 hanging out. Then get 1/2 inch plywood and you have yourself a tray that you can slide in and out to clean. This way your droppings/excess feed wont fall to the ground...where it can look bad and attract rodents.
Last Edited by on Jun 12, 2010 10:13 PM
|
steve49
515 posts
Jun 13, 2010
6:27 AM
|
smooth idea, Game.
----------
Steve in Blue Point, NY
|
Pogohawk
147 posts
Jun 13, 2010
7:23 AM
|
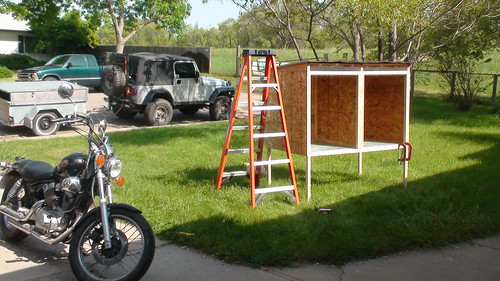
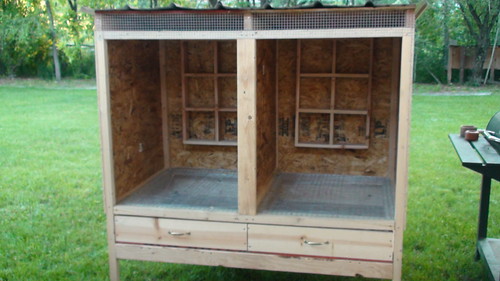
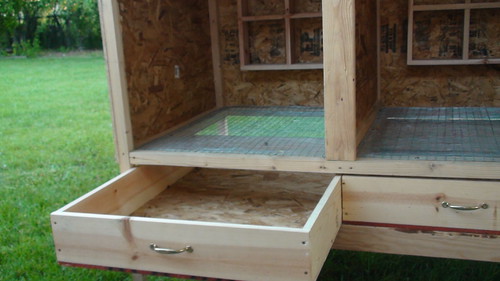
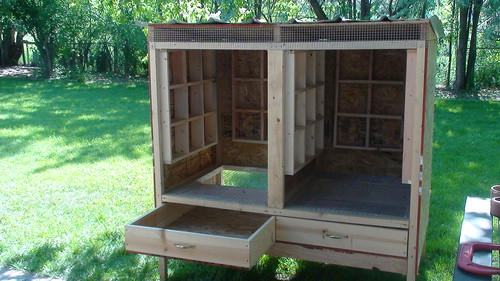
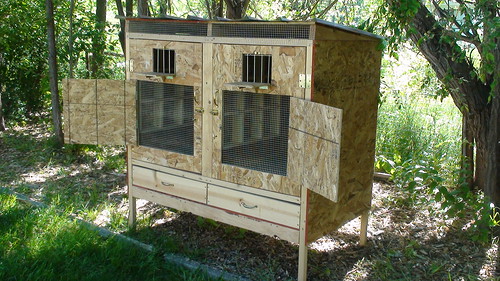
A few more pictures. I haven't been able to work on it that much due to the weather. I'm hoping I can get in finished by the middle of this week. I did end up useing 1" by 1/2" mesh on the bottom to pass droppings better. There is also 8" of clearance between the mesh and bottom of the drawer.
 Last Edited by on Jun 13, 2010 7:29 AM
|
Alohazona
715 posts
Jun 13, 2010
2:02 PM
|
Pogo,
Everything looks great!
One thing you might want to do before you get to far along is increase the ventilation.I would drop the pooptrays down one more level.I built a triple box last year with the same design,and respiratory flew right through my kit boxes.The area where the drawers are now, can be screened off.Respiratory is contagious and will reek havoc with the birds for a couple of months even with medication.As you fill up the boxes,and with it being summer with the onset of the moult,it will be a good measure of security in your design.Since I have made the adjustment not one casuality.Hope this helps.....Aloha,Todd
|
polarbear
109 posts
Jun 13, 2010
5:01 PM
|
Tyler, the box looks good.
What are the dimensions of the box, and how many perches are there going to be in each side?
I built one unit 8ft. long and divided it into 3 sections. It is alittle small than i like. Maybe I will build a double similar to yours, to give the birds just a bit more room.
|
Jerry Allen
GOLD MEMBER
411 posts
Jun 13, 2010
6:33 PM
|
Pogo,
If you make a few modifications to the trailer hooked up to the Jeep, you would have a nice portable
kit box. :)))
Good looking kit box.
|
TheGame
755 posts
Jun 13, 2010
8:49 PM
|
You can drill 1 inch holes in a straight line towards the top back of the kitbox for ventilation.
|
Sound Rollers
349 posts
Jun 14, 2010
7:13 AM
|
Nice kit box and looks very economical.


|
Pogohawk
148 posts
Jun 14, 2010
7:33 AM
|
Thanks guys. I do plan on adding a bit more ventilation. I'm trying to decide if I'd like to do the same thing as the front or put in adjustable vents in the back. The dimensions of the box its self are 5' wide, 3' deep and 3' tall. Including the legs it stands about 5' tall. I plan on putting 24 perches per side, I'm still not too sure how I'd like to arrange them. Jerry, I was thinking of attaching the kit box to the trailer at some point, it fits in there almost perfectly. We're still working with less than $100 in material so I'm pretty happy with that. I'm going to work on it a little today so I'll post some pictures once we get a little further.
|
TheGame
758 posts
Jun 18, 2010
2:29 PM
|
Pogohawk if you do more ventilations in the back do it so they have covers for the days it is windy with either rain or snow. Because the inside of your kitbox will get wet.
|
Oldfart
GOLD MEMBER
1846 posts
Jun 18, 2010
3:18 PM
|
Good work! I can't wait to see it finished.
Thom
|
Pogohawk
155 posts
Jun 22, 2010
9:45 PM
|
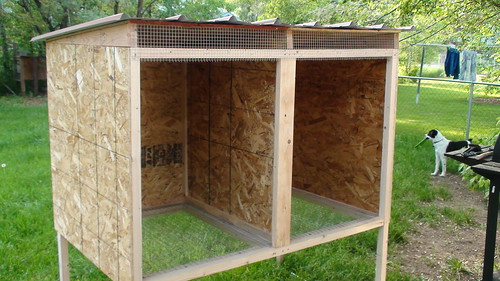
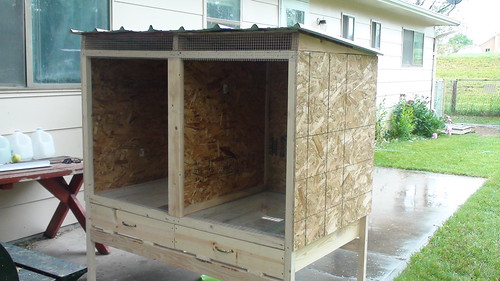
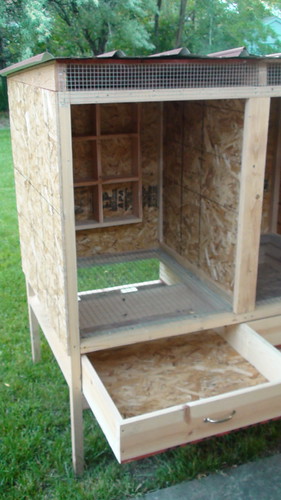
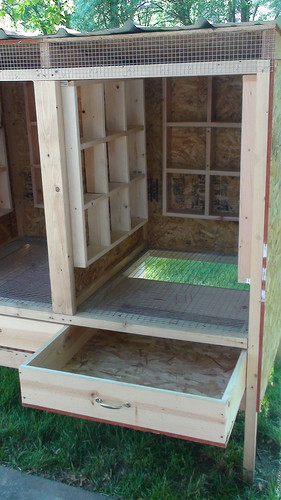
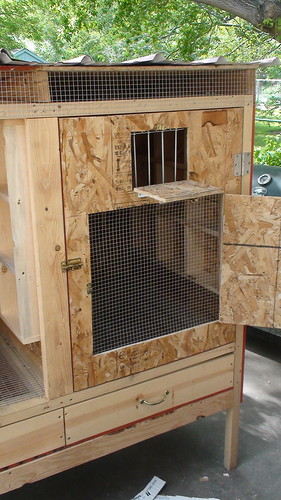
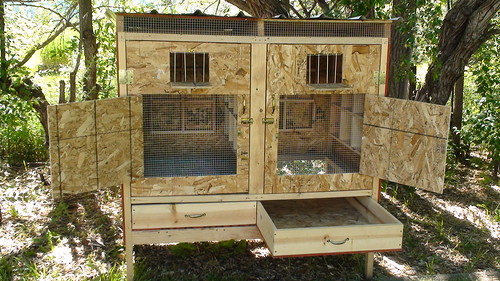
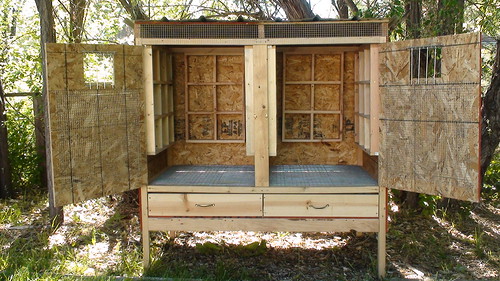
Finally got some decent weather to work on the kit box. Now I need more perches, ventilation and a nice front.
 Last Edited by on Jun 22, 2010 9:46 PM
|
Oldfart
GOLD MEMBER
1862 posts
Jun 23, 2010
3:25 AM
|
I like the pull out trays, Pogohawk.
Take care
Thom
|
Oldfart
GOLD MEMBER
1863 posts
Jun 23, 2010
12:05 PM
|
Hey Pogo, I have pull out trays on my first kit box and they work great. I keep the bottom of the tray covered with an inch of play sand. It keeps anything from sticking and makes cleanup easy. I just pass the sand and feathers and droppings through a kitchen strainer. The sand can be used over and over.
I also use a piece of oil cloth in the bottom of the tray under the sand. It will protect it from any moisture. I get mine at Wall Mart in the material, sewing section by the yard. I just use clear and it looks like a very heavy piece of plastic.
Take care
Thom
|
Pogohawk
156 posts
Jun 23, 2010
4:56 PM
|
|
TheGame
763 posts
Jun 23, 2010
7:00 PM
|
Looks good! Are you going to scrape the pullout drawers? It looks like you used recycled wood and not something smooth. If you scrape it its going to chip the wood away. I would suggest either adding a smooth thin luan on the bottom or just use newspaper to line the tray.
|
jnyce
890 posts
Jun 23, 2010
7:49 PM
|
Thats a great job there buddy
jerry t
|
Pogohawk
157 posts
Jun 24, 2010
6:59 AM
|
Hey Game, Thom suggested I use sand in the bottom with a layer of oil clothe beneath, so I think I'm gonna try that. Your right though, particle board is a pain in the butt to scrape.
|
Oldfart
GOLD MEMBER
1864 posts
Jun 24, 2010
8:30 AM
|
Pogo, One last thought on the pull out tray. I made a sieve by covering a 12x12" frame with 1/4 hardware cloth. This removes all of the large clumps and feathers and makes it much easier to get the fine stuff out with the kitchen strainer. I hope this works as well for you as it has for me.
Take care
Thom
Last Edited by on Jun 24, 2010 2:29 PM
|
TheGame
765 posts
Jun 24, 2010
2:00 PM
|
Pogohawk the sand that Thom suggested sounds like a good idea too. Let us know how it works out for you.
|
steve49
524 posts
Jun 25, 2010
12:25 PM
|
why do so many guys tilt the roof back when designing a kitbox? i prefer the roof slanted towards the front for one reason, you can easily see the birds when they're on top of the box, whereas its harder to observe them if the highest point of the roof is in front.
----------
Steve in Blue Point, NY
|
Pogohawk
158 posts
Jun 25, 2010
7:16 PM
|
|
TheGame
766 posts
Jun 25, 2010
10:36 PM
|
Pogohawk if those bob traps dont work out for you Id suggest using the 45 degree PVC elbows. I use them for my kitbox and it works like a charm... never had a bird get out or close to getting out. Also makes it harder for racoons/cats to get into the kitbox because its only 4inch in diameter.
|
TheGame
767 posts
Jun 25, 2010
10:40 PM
|
Here are some pics of my dual kitbox that I built. It looks very similars to yours but slightly different. For instance for the divider I used 2x3 with a gap so I could just slide the plywood in.

I made my ventilation door flap downwards to save room and so its not swaying around on a windy day.

And here is a pic of the PVC elbow that works great. Also a lot cheaper than buying a bob trap.
 Last Edited by on Jun 25, 2010 10:47 PM
|
jnyce
892 posts
Jun 26, 2010
7:57 AM
|
nice box game
----------
jerry t
|
Oldfart
GOLD MEMBER
1865 posts
Jun 26, 2010
8:02 AM
|
I agree with Jerry, nice box Game!
Thom
|
Tony Chavarria
Site Publisher
4112 posts
Jun 26, 2010
8:09 AM
|
Very Nice Indeed!
----------
FLY ON!
Tony Chavarria
The highest form of ignorance is to reject something you know nothing about.” – Dr. Wayne W. Dyer
|
JDA
GOLD MEMBER
878 posts
Jun 26, 2010
4:53 PM
|
Nothing like barn yard red.My pick always.JDA
|
Pogohawk
159 posts
Jun 26, 2010
6:06 PM
|
Hey Game, my box probably look similar to yours because most of the inspiration for my kit box came from yours. I searched through all the old post and looked at a hundred or more pictures of boxes. I really appreciated all of the pictures that you had, it gave me a good basis to start mine. I was glad you had so many pictures of the framework and such. I had no idea your devider came out, thats a really cool idea. Mine is fixed in place. I don't think I'll be able to trim mine as nicely as yours either. Looks good man!
|
TheGame
769 posts
Jun 26, 2010
6:55 PM
|
Sweet Pogohawk im glad my pixs could help. I actually copied TT's kitbox who copied Oscar's LOL.
Are you going to paint your kitbox?? I highly recommend you do if you want it to last. I stained my kitbox because it is easier than painting and then used latex paint for the trims.
Last Edited by on Jun 26, 2010 6:56 PM
|
Pogohawk
160 posts
Jun 26, 2010
7:37 PM
|
Yeah I'll have to paint it because of the particle board. I'm gonna try to match the color of my breeding loft and then stain the trim as well. I like that your vent door drops down as well. I did mine to the side so that it wouldn't interfere with my poop trays.
|
TheGame
773 posts
Jun 26, 2010
7:58 PM
|
Gotcha. Well you did a really good job with the trays. Idk if you can see mine but mine is just a simple piece of plywood that I pull out. One bad thing about mine is that its only about 2-3 inches from the wire platform and my birds can poke their heads through the chicken mesh and pick up seeds off of it. Also I have to clean mine out every 2-3 days otherwise the poop accumulates to fast and when I pull the tray out it hits the frame knocking some poop to the ground. I usually throw another small sheet of plywood on the ground to catch that.
So what did you end up doing for ventilation in the back? I used 1 inch holes spaced apart about every 4 inches or so in a line on the top back.
|
Pogohawk
161 posts
Jun 26, 2010
8:45 PM
|
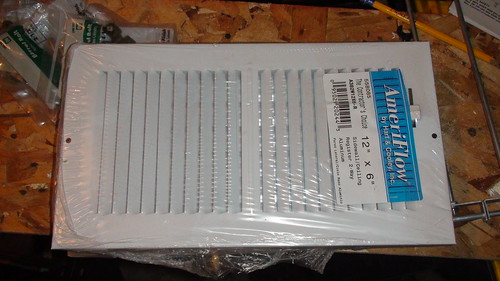
I'm going to put some 12" metal vents below the perches at floor height. The vents have little levers on the outside so you can adjust the air flow. It snows a lot here so I have to be able to close them sometimes.
Check this out, I have the same problem with the waste trays on this box. I had to improve on the new box.
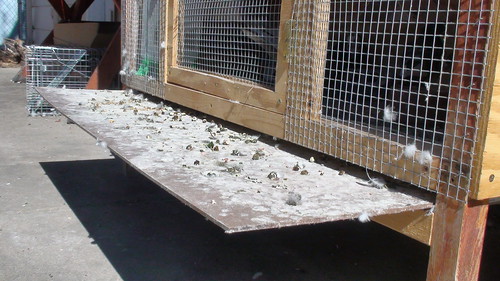 Last Edited by on Jun 26, 2010 9:13 PM
|
TheGame
774 posts
Jun 26, 2010
8:54 PM
|
Yup thats exactly how my pullout tray looks and works like LOL. But its not too bad I try and scrape it every 2 days right after I let the birds out. It only takes a few minutes and then its nice and clean for when the bird come back in.
Also very good that you have levers to adjust the vents. Can you post pictures?? My breeding loft needs something like that.
|
Pogohawk
162 posts
Jun 26, 2010
9:12 PM
|
This is what I've used on other lofts and they work pretty well.
|
TheGame
775 posts
Jun 26, 2010
9:40 PM
|
Oh ok I see. I dont know if something like that would work for my loft. As you can see my vents along the top are all about almost 3ft long by 5inches. I dont know if they make something like that.

|
DeepSpinLofts
1671 posts
Jun 28, 2010
3:19 PM
|
Outstanding craftmanship! I am highly impressed.
Marcus
Deep Spin Lofts
|
Pogohawk
163 posts
Jun 28, 2010
3:39 PM
|

|
Oldfart
GOLD MEMBER
1873 posts
Jun 28, 2010
6:55 PM
|
Very Nice,, now fill it with birds! :)
Thom
|
polarbear
120 posts
Jun 28, 2010
7:09 PM
|
Looks good Pogo.
Now like thom said, fill it up and fly the crap out of them.
|
Pogohawk
164 posts
Jun 28, 2010
8:16 PM
|
Thanks guys. I've got 7 nice babies in the nest now and waiting for three more pair to go down on eggs. I got rid of all my old stock and started fresh with birds I brought back from California. I can't wait to get them in the air.
|
Oldfart
GOLD MEMBER
1902 posts
Jul 04, 2010
12:45 PM
|
Ty, Have you tried the sand in your clean out tray yet? I'm anxious to see if you like it.
Take care
Thom
|
Pogohawk
178 posts
Jul 05, 2010
11:55 PM
|
Hey Thom, I haven't got a chance to pick some up yet but I'll let you know how its turns out once I do. I actually ended up putting a breeding pair in one side so I can get a jump start on filling the other side with birds, so it would be nice to have it finished soon.
Ty
|
washington86
563 posts
Jul 06, 2010
10:03 PM
|
These are some very nice kit boxes.
----------
W.Cha
|